
how to make birch arch for a wedding?

To make a birch arch for a wedding, you will need several birch branches of varying lengths, a sturdy base or frame to support the arch, and some additional materials such as floral wire or zip ties. Start by securing the base or frame in the desired location, ensuring it is stable and level. Then, arrange the birch branches in an arch shape, attaching them to the base or frame using floral wire or zip ties. Trim any excess branches or foliage as needed to achieve the desired look. You can also add additional decorations such as flowers, ribbons, or fairy lights to enhance the overall aesthetic. Finally, make sure to test the stability of the arch before the wedding to ensure it can withstand any weather conditions or potential movement.
1、 Selecting and preparing birch branches for the arch
To make a birch arch for a wedding, you will need to follow a few steps. The first step is selecting and preparing birch branches for the arch. Birch branches are known for their beautiful white bark, which adds a rustic and elegant touch to any wedding decor.
Start by selecting straight and sturdy birch branches that are about 8-10 feet tall. Look for branches with a diameter of at least 2-3 inches to ensure they can support the weight of the arch. It's important to choose branches that are relatively fresh and free from any signs of rot or damage.
Once you have selected the branches, you will need to prepare them for the arch. Begin by removing any loose bark or twigs using a sharp knife or sandpaper. This will give the branches a clean and polished look. If desired, you can also lightly sand the branches to smooth out any rough edges.
Next, you will need to assemble the arch. Start by securing two sturdy posts into the ground, about 6-8 feet apart. Then, attach the birch branches to the posts using strong twine or floral wire. Make sure to position the branches in a way that creates a graceful arch shape.
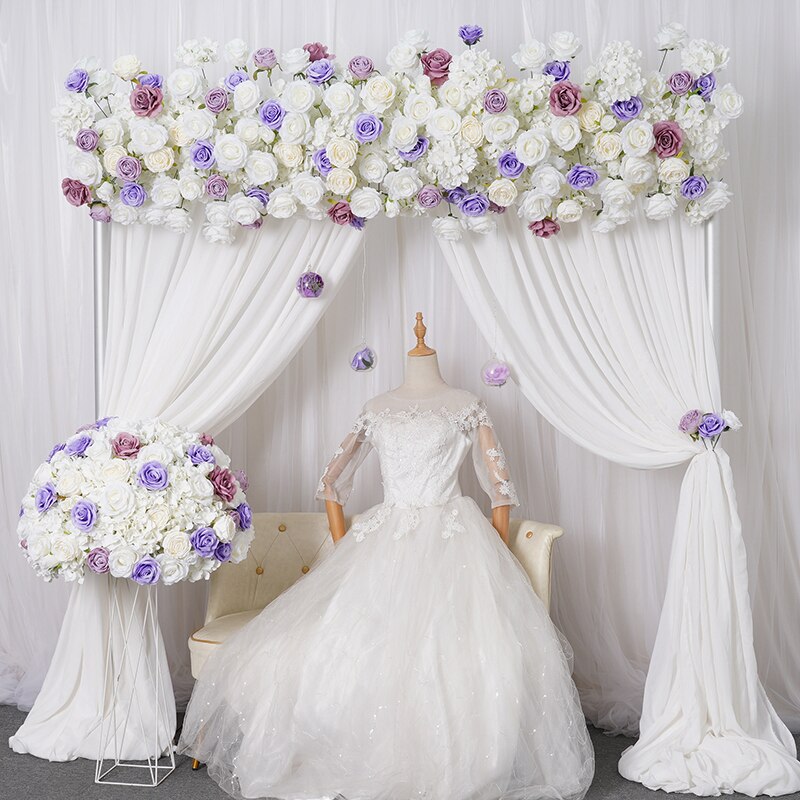
To add a personal touch, you can decorate the birch arch with flowers, greenery, or fabric. Consider using flowers that match your wedding theme or colors to create a cohesive look.
In conclusion, making a birch arch for a wedding involves selecting and preparing birch branches, assembling the arch, and adding decorative elements. This natural and rustic arch will create a stunning backdrop for your special day.
2、 Constructing the frame and base of the birch arch
To make a birch arch for a wedding, you will need to follow a few steps. The first step is to construct the frame and base of the arch. This will provide stability and support for the birch branches.
Start by selecting four sturdy birch branches that are approximately 8 feet tall. These will serve as the main vertical supports of the arch. Dig four holes in the ground, about 2 feet deep and wide enough to accommodate the birch branches. Place the branches in the holes, making sure they are evenly spaced and standing upright. Use a level to ensure they are straight.
Next, you will need to connect the top of the birch branches to create the arch shape. Measure and cut two additional birch branches to the desired length for the arch. Attach one end of each branch to the top of the vertical supports using strong twine or wire. Make sure the branches are securely fastened and the arch is symmetrical.
To strengthen the structure, add diagonal support beams between the vertical supports and the arch. Cut two more birch branches to the appropriate length and attach them diagonally from the top of the vertical supports to the arch. Secure them tightly with twine or wire.
Finally, reinforce the base of the arch by burying the bottom of the vertical supports in the ground or securing them with heavy-duty stakes. This will ensure that the arch remains stable throughout the wedding ceremony.
Remember to consider any additional decorations or embellishments you may want to add to the birch arch, such as flowers, ribbons, or fabric draping. These can be attached using floral wire or zip ties.
Overall, constructing the frame and base of the birch arch is the first step in creating a beautiful and sturdy structure for a wedding ceremony.
3、 Attaching and securing the birch branches to the frame
To make a birch arch for a wedding, you will need birch branches, a sturdy frame, and some tools for attaching and securing the branches. Here is a step-by-step guide on how to create a beautiful birch arch for your special day:
1. Gather the birch branches: Look for straight and sturdy birch branches of various lengths. You can either purchase them from a local florist or gather them yourself if you have access to birch trees.
2. Prepare the frame: Start by assembling a sturdy frame that will serve as the base for your arch. You can use PVC pipes, metal rods, or wooden beams to create the frame. Make sure it is stable and secure.
3. Attach the birch branches: Begin by attaching the longest branches to the top of the frame, forming an arch shape. Use zip ties, floral wire, or strong twine to secure the branches to the frame. Continue adding branches, layering them to create a full and natural look.
4. Secure the branches: Once all the branches are attached, go back and reinforce any loose areas. Use additional zip ties or wire to secure any branches that may be wobbly or unstable.
5. Trim and shape: Trim any excess branches or leaves that may be sticking out or obstructing the arch's shape. You can also shape the arch by bending and manipulating the branches slightly to achieve the desired look.
6. Decorate: Once the birch arch is securely assembled, you can add additional decorations such as flowers, ribbons, or fairy lights to enhance its beauty and match your wedding theme.
Remember to consider the size and weight of the birch branches when choosing your frame. It's important to ensure that the frame can support the weight of the branches and any additional decorations. Additionally, always prioritize safety when working with tools and securing the branches to the frame.
Attaching and securing the birch branches to the frame is a crucial step in creating a sturdy and visually appealing birch arch for a wedding. By following these steps and taking the latest point of view into account, you can create a stunning birch arch that will add a touch of natural elegance to your special day.
4、 Decorating the birch arch with flowers and other embellishments
To make a birch arch for a wedding, you will need a few essential materials and some creativity. Here's a step-by-step guide on how to create a beautiful birch arch for your special day:
1. Gather the materials: You will need several birch branches, preferably with a smooth and straight texture. You can either purchase them from a local florist or find them in nature. Additionally, you will need a sturdy base, such as a wooden frame or metal stand, to support the arch.
2. Assemble the arch: Start by securing the birch branches to the base, arranging them in an arch shape. Use strong wire or zip ties to attach the branches firmly. Ensure that the arch is stable and can withstand any outdoor elements.
3. Decorate the arch: Once the structure is in place, it's time to add the finishing touches. Decorating the birch arch with flowers and other embellishments can create a stunning visual impact. Consider using fresh flowers that match your wedding theme or opt for artificial flowers for a longer-lasting effect. You can also incorporate greenery, such as eucalyptus or ivy, to add texture and depth.
4. Arrange the flowers: Start by attaching a floral foam or water tubes to the branches. This will help keep the flowers hydrated throughout the event. Begin arranging the flowers, starting from the top and working your way down. Use a mix of different blooms, varying in size, shape, and color, to create an eye-catching display. Secure the flowers with floral wire or zip ties, ensuring they are firmly attached.
5. Add other embellishments: To enhance the overall look of the birch arch, consider adding other decorative elements. You can incorporate fairy lights, ribbons, or fabric drapes to create a romantic ambiance. Additionally, hanging lanterns or crystals can add a touch of elegance and sparkle.
Remember to consider the latest trends and your personal style when designing your birch arch. Whether you prefer a minimalist, bohemian, or rustic look, the birch arch can be customized to suit your wedding theme and preferences.


Leave your comment